
 July 17th, 2019
  easygroup
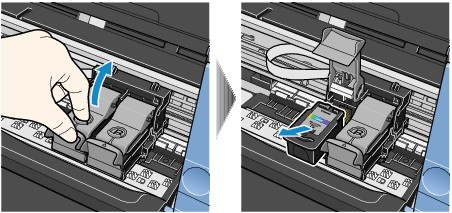
Installing and replacing Canon inkjet cartridges for your Canon printer offers several challenges, especially if you are doing it for the first time. It may not be easy at first, but with constant practice, everything will be smooth and easy after.
To start, simply follow the steps below to properly replace the Canon inkjet cartridges of your printer:
1. First, you have to choose the color of your ink cartridge that is specific for your printer. There are different colors available: black, colored, and tri-colored.
2. After that, turn on your Canon printer. If you’re not familiar with your printer yet, the on/off switch is located at the top right side of the printer. After that, slowly open the printer’s lid and wait for a while until the automatic disengagement of the cartridge carrier happens.
3. Hold the old Canon inkjet cartridges behind and slowly pull the cartridge until such time that it pops out of the carrier. You have the option to throw the old cartridge away or recycle it and probably used it again.
4. Carefully place the new cartridge into the carrier while making sure that it is in the proper position. Afterward, press the cartridge carrier gently until such time that it is in its proper position.
5. Finally, close the printer lid so that you can test the new cartridge for printing quality.
Conclusion
Replacing inkjet cartridges in a printer isn’t really that hard. However, if you’re a first-timer, you can just follow the steps mentioned above.
 Posted in
  Tags:
Tags: